
I tried the masking film I ordered from SignWarehouse on the 1/4" Birch Plywood and it mostly doesn't work. It's not tacky enough and as it melts it peels back away from the cut so the board still gets charred. It works where it sticks it just doesn't stick around the entire edge. Bummer... that was a waste of cash. Will have to find something else. [UPDATE] After a quick search on SawMillCreek forums I realized ordering plastic film as a mask was one of the least brilliant purchases I've made in a while. Don't know why I didn't think about it... I saw someone else recommend it on Thingiverse and just blindly ordered. Turns out plastic melts! Shocker. I've tried masking with blue painters tape before and it worked great. So now I need to source some PAPER transfer tape... or just buy a bunch of 3" blue painters tape. Hmm.
Posts filed under Laser
Birch Plywood Testing and 3D Engraving
Quickly, here's some results from 1/4" x 2 ft. x 4 ft. Birch Project Panel Plywood that I picked up at Home Depot. It's got Birch veneer with "whitewood" core, which you can see in the first photo. Second photo is of the cut and raster tests. After that I ran a quick 3D Raster Engrave test. For cutting with 1 pass, it looks like Power 50 Speed 14 or so works well. Rasters are also nice.


RetinaEngrave 3D Raster Engraving
FSL's software is very good overall, but the newer 3D Raster Engrave function still feels like a bit of a hack. Instead of varying the laser power for each pixel, it has to do multiple passes at a single power. I'm not sure if other lasers have the aforementioned capability to engrave with one pass or if they all work this way. That said, it works pretty well.
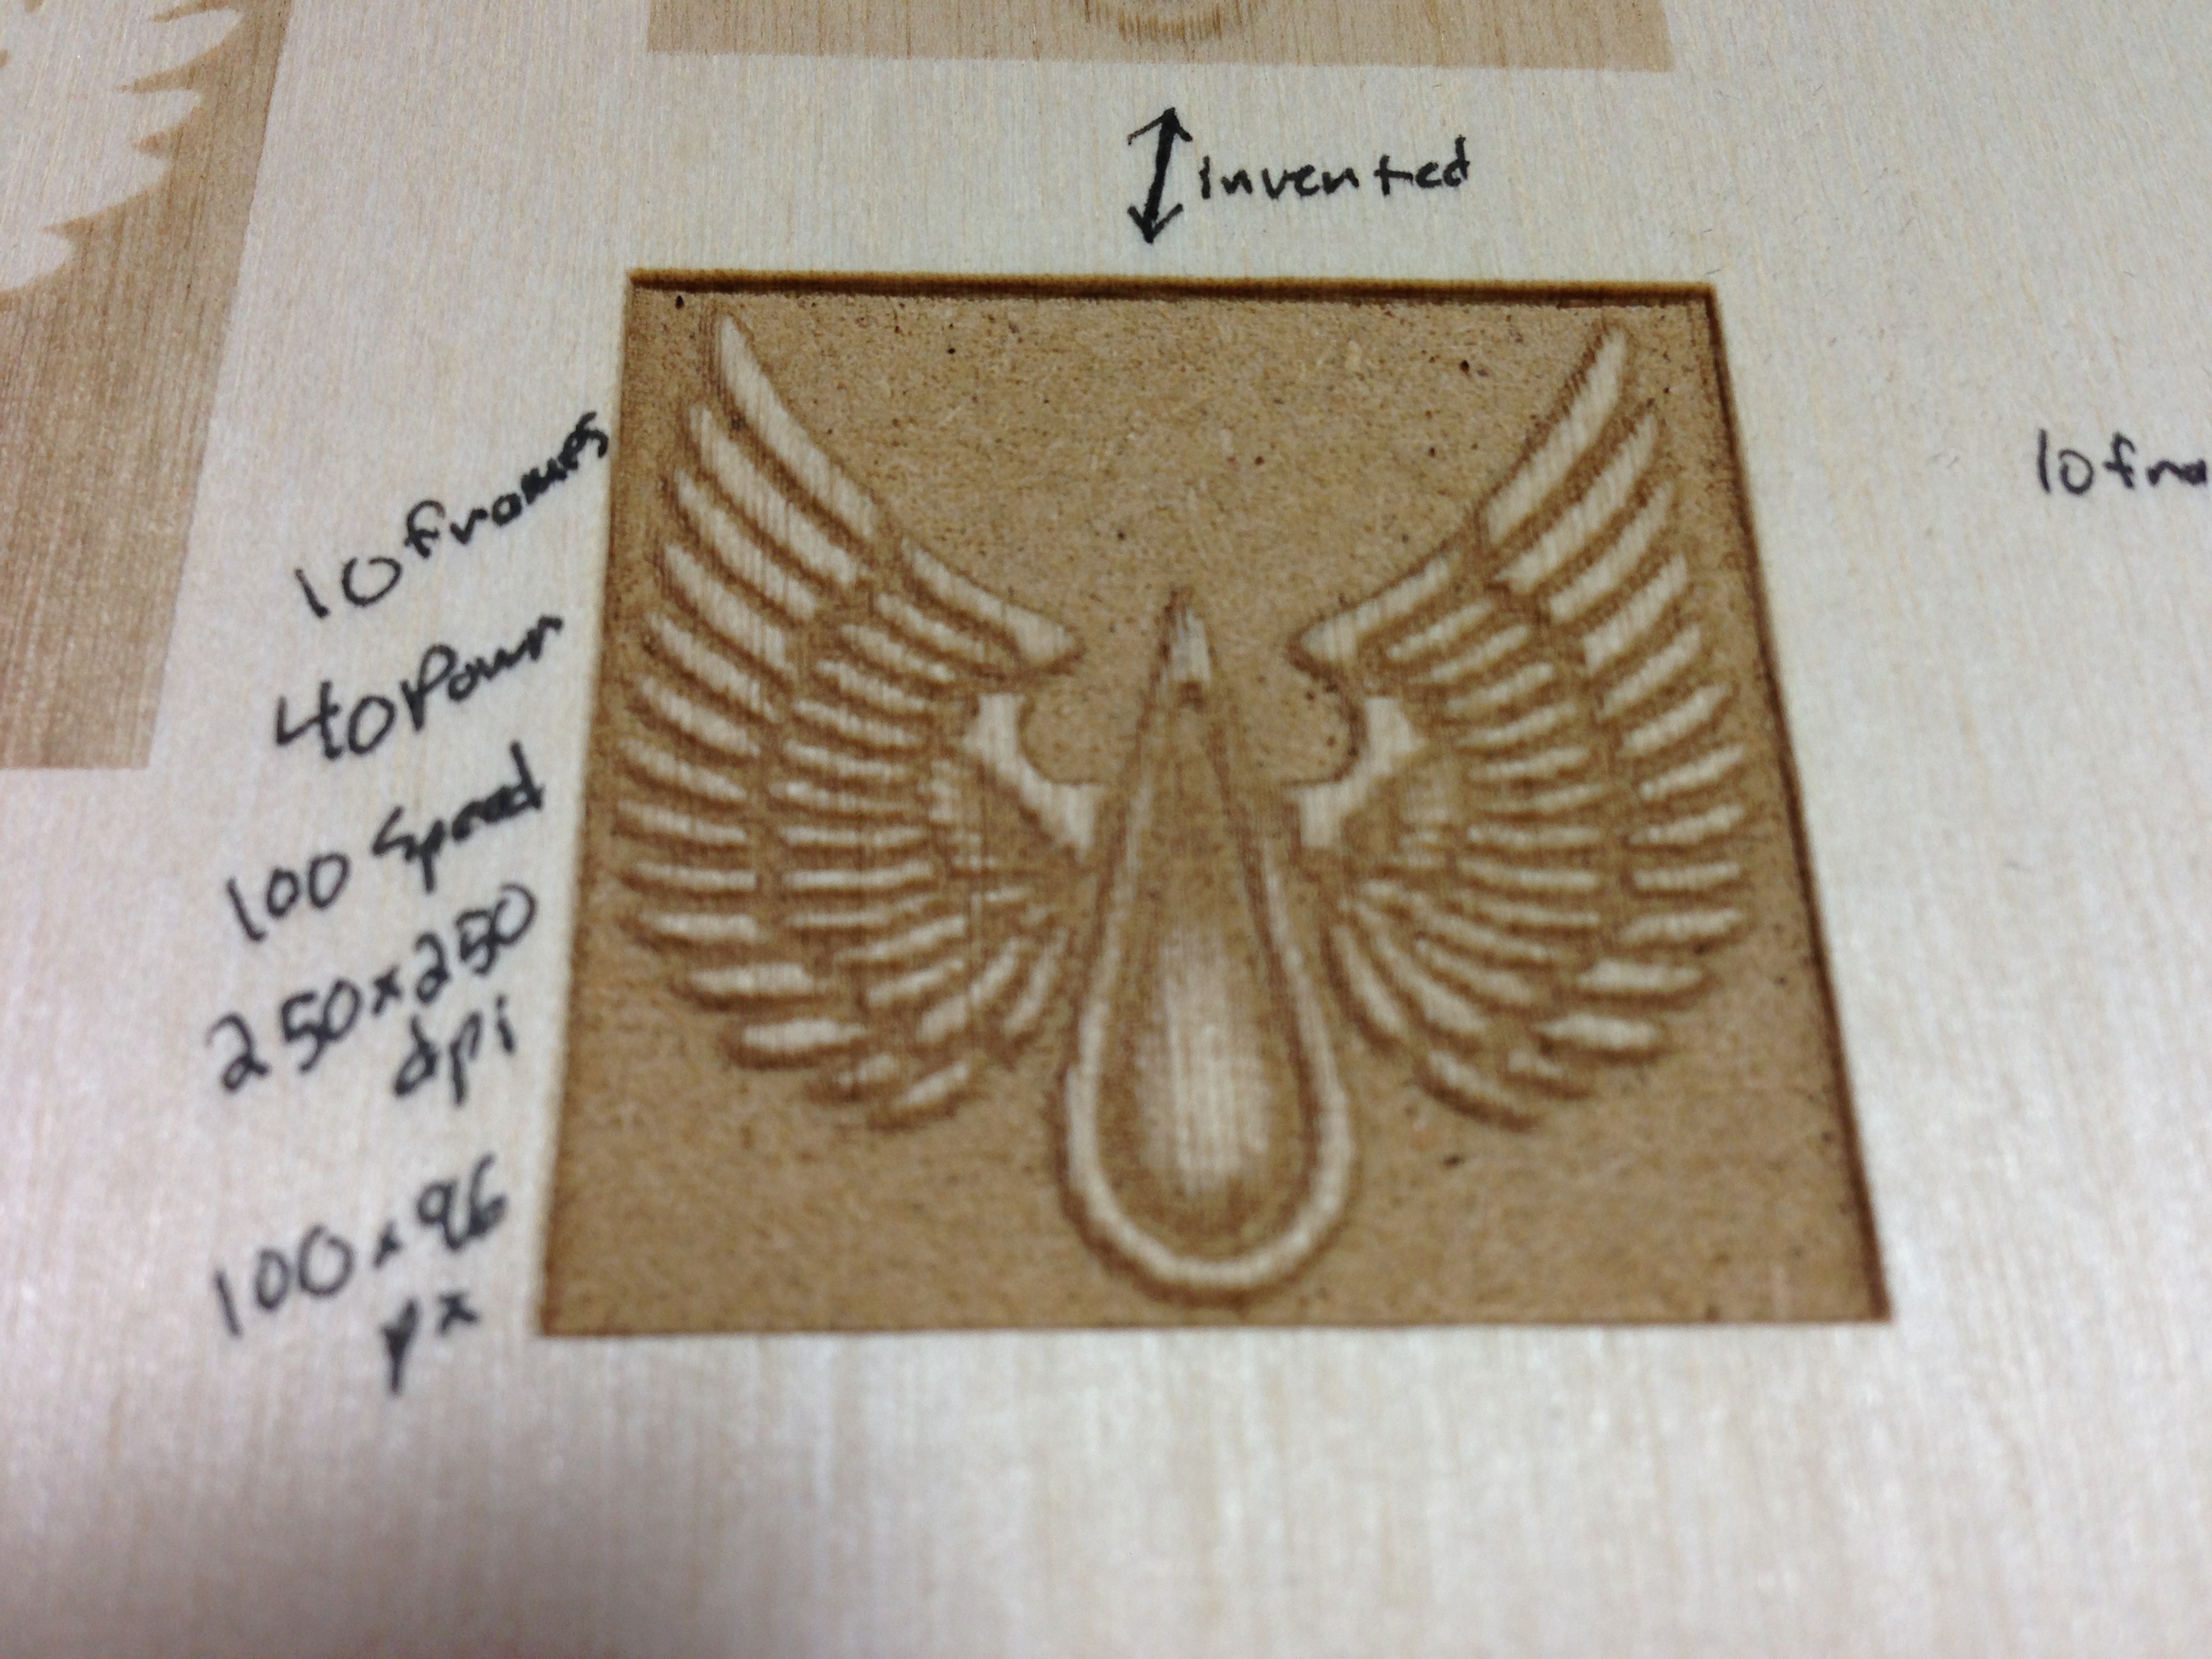
You have to Print a grayscale image to RetinaEngrave, then click the 3D Raster tab or select if from the Tabs menu if it's not visible. Then you set the Raster Power and Speed settings and the number of "frames" you want (every frame is one pass of the raster engrave), then click "Auto Generate Frames." You can also create each frame manually if desired. After creating the frames you can go back in and edit their power, speed, and threshold individually. Creating frames basically slices the grayscale image and generates a Z-depth layer for each value of gray. The more frames you create, the greater your Z-depth resolution and the more passes the laser will take. So based on the original grayscale image, in final output to the cut material, a white pixel will get no engraving, a 50% gray pixel will get engraved to half of full depth, and a black pixel will get engraved at full depth. What that depth is depends on your power and speed settings, and how many frames/passes you do. Once you have the frames generated, each frame is a black and white representation of a Z-depth layer. So with every pass, black pixels will fire the laser and will get cut another layer deeper, white will not. Hope that makes sense. It's much clearer when looking at the software.
The first try was the large box in the upper left of the "TEST" Image above. It was 2.5" and was set at 500x500dpi with 10 passes. After the second pass I got impatient and realized I could test an image a quarter that size at half the resolution, and that I needed more power. Rastering takes forever! At that size and resolution, it's doing 1250 passes on the Y axis per layer/frame. So I went back to photoshop and quartered the size, reimported and upped the power to 40 per layer and the resolution to 250x250dpi. I kept it at 10 frames. That resulted in what you see below. Not bad, and I can imagine more frames would come out even nicer. I didn't record the time it took but it wasn't fast to say the least.


Pretty cool feature and I have some interesting ideas of what to do with it when time allows. It's going to take some experimentation.
Dangerous Materials
Last post I mentioned I cut some ABS sheeting for a friend's project. As Angie Brennan pointed out to me on Saw Mill Creek's forums, this probably isn't the most healthy idea in the world. According to the ATX Hacker Space website, which has a very nice chart of what you should and shouldn't cut on their laser, the ABS "Emits cyanide gas and tends to melt." While I disagree that it doesn't cut well, at least in thin sheet form, it's probably best to heed the warning about cyanide gas. My laser is well ventilated and the negative pressure setup should send all bad stuff outside... I have no way of measuring or knowing so I'll be limiting this stuff in a big way. After a long search on Google my conclusion is this:
Pretty much everything you can cut with a laser will emit something that is NOT good for you to breath. Paper, plastic, acrylic... all of it. So ventilate well, even after the cut so any leaching from hot plastic is minimized, wash your hands, and limit cutting plastics as much as you can.
This is probably a good place to link to the Make page about determining unknown plastics. Better to find out what you are cutting than to breath chlorine or cyanide eh?
Materials Testing
I've probably put about an hour of laser time on my tube by now, Here's the first few things I've been cutting and some stuff I've learned.
RetinaEngrave and Illustrator
I use Illustrator for a lot of the graphic design I do so naturally, I'm using it with the Full Spectrum Laser. Their print driver makes this VERY easy. Just hit print and off it goes to RetinaEngrave (which has to be open in the background and already connected to the laser). Here's a few things I've learned the hard way:
- Make sure you are in RGB mode in File -> Document Color Mode. The couple of times I had the file in CMYK, weird stuff happened. Notably, on one cut it did two passes on each vector line though it was only set to one, another time only some of the lines showed.
- Use a line stroke of .25 or less. I found that anything over .25 would cause RetinaEngrave to double up the line in order to make the vector wider than the laser cut. I've been using .1 lately and it works great.
- Make sure Media Size is set to "FSL Hobby Series Gen5 20x12" in the Print Dialog box. When ready to print, make sure this is selected in the print dialog box or the print area might get cropped.
- Make sure artwork is within artboard boundary. In "Document Setup" make sure to make your artboard bigger than your artwork.
- It's important that line segments are joined or RetinaEngrave will treat each segment as a line and instead of following a path, will jump from line to line. For example, if a square is just 4 line segments, it may do the verticals first then the horizontals instead of just tracing the shape of a square if the vectors were all joined. We ran into this issue importing from CAD to Illustrator with a DXF file. The file was a large array of 6mm squares, initially importing them into RE took forever until I realized it was importing thousands of vector lines instead of hundreds of squares.
I'll update if I find anything else but overall I've been happy with Illustrator and RetinaEngrave. The scales translate and the cuts are true to size.
testgrid
The test pattern that is included in the software is pretty handy, though I really wish I could specify the number of grid steps it does instead of the hard wired 7x10. It basically cuts a grid of squares starting at low power low speed in the upper left and ends with high power high speed in the bottom right as you see in the image to the right. This is great for working out the optimal speeds and powers for a given material. I'll probably end up making my own version of this since the software only allows you to change the upper and lower limits of the range for both speed and power but not the number of steps. I.E. you can tell it to test from 0-50% power and from 20-80% speed, but no matter what it will do 7 steps between those speed values and 10 between the power values. There is also a focus ramp test which I have yet to use but should soon.
Cuttin'
quarterInPlyCheapo
After the first cuts on cardboard I grabbed some cheapo 1/4" 5-ply plywood from Home Depot I had laying around in the garage and had a go at it. It took at least 2 passes to cut through it and going really slow at full power. The charring around the cuts is really bad to the point of it being charcoal. I think this wood would etch really nice but for cutting, not so good.
So I ran to Home Depot and got a few sheets of 1/8 in. x 2 ft. x 4 ft. MDF Cut To Size Panel for about $4 each. I also got a panel of 1/4 in. x 2 ft. x 4 ft. Birch Project Panel Plywood (which I have yet to test). I cut the panels up into 4 20" x 12" pieces which left me with a couple 12" x 8" pieces per sheet. It cuts very nicely and I settled on a Speed setting of 30 and Power of 80 to get a nice cut. The char on the cut is nice but it does leave a pretty bad smoke stain on the top surface ... which is probably more glue gunk than smoke. I purchased some film (06.50 inch x 100 yds R-Tape Clear Choice AT-60) from SignWarehouse.com today to see if I cover the pieces with that before cutting will prevent the smoke char on the top surface. The smell is pretty strong and it sticks with the wood for days if not forever. It also rasters pretty well as you can see in the lower left of the image to below.
EigthInMDF
ParaRatBones
It's pretty impressive how detailed and thin you can make the cuts and the piece is still pretty solid. Those "drips" are insanely tiny.
So after that I decided to try a long Raster Then Vector style cut and I came across these Palago game tiles on Thingiverse which looked like a great test, not to mention the kind of game I love to play. I redid the file in Illustrator CS6 (which you can download here). I cut at Power 85 Speed 30 and rastered at Power 70 Speed 100. Sweet.
palago
I've also cut sticky back ripstop nylon at Power 10 Speed 100 and it cut the nylon but didn't go all the way through the paper backing so it was perfect for peeling. No photo ATM. Next was skateboard grip tape... Jessup to be exact. I cut on the paper backing side and Power 60+ Speed 100 seemed to work well. I tried to cut from the front and just cut the front grip and not through the paper backing but no such luck. Regardless it comes out well and is easy to peel afterwards. Going to do some custom grip for my brother's skate shop FIDNA at some point soon. Results below:
FidnaTape
Lastly, today I cut some 1/32" or .9mm thick ABS plastic sheeting. It's textured on one side and shiny on the other and cuts well at about Power 100 Speed 80-90 from either the textured or shiny side. Though it does warp if you do a lot of very close cuts quickly as you can see in the test grid. We cut out a matrix of squares to fit around RGB LED strip lights that my buddy is using to make a large timer for his DLG comps... more explanation and photos once it's done since that probably makes no sense to anyone.
ABSSheet
Issues/Problems
The only real problems I've run into with RetinaEngrave have been with the software hanging on launch, and it's usually just because I've pressed a button before the software was fully loaded. I've now learned to wait until it's connected to the laser, and the spinning wheel at the bottom left of the window is spinning. If it's stopped and I press a jog button, the software tends to hang.
Another bug is that every once and a while a jog button will "stick" and the head will run to the end of the axis. I've had this happen numerous times where I'll click quickly on a jog button to move the head and the head will just keep going until I click the button again or until it hits a stop. Still haven't quite sorted that out yet.
I've also just today had an issue where cuts along the X axis weren't as deep as those along Y which I haven't sorted... but I think is due to the guide wheel tension. I have to do a cleaning and alignment soon and will check this issue out then.
And lastly, the 1/4" ID hose on the air assist pump blew off today mid cut and scared the shit out of me because I had no idea where the loud buzz was suddenly coming from. Which reminds me... I need to find a quieter air assist. The one from FSL is crazy loud and by far the loudest component of the system. I can't cut at night in the house with it or my 2 year old would not be happy.
First Cuts, and Networking
She works beautifully! It took a buddy and I about 20 minutes to figure out the networking setup so I could use the ethernet port instead of USB, but it worked perfectly first shot after we got that sorted.
Using a Full Spectrum Laser with RetinaEngrave on Mac OS X
Want to run RetinaEngrave but don't have a PC? Want to run it in a virtual machine with an ethernet connection instead of a dodgy USB connection? Read on.
I bought a used iMac to run my 3D printer and Laser. It's the environment I'm used to and I'd rather have the option of both operating systems rather than just Windows. So I'm running Parallels 8 with Windows 7 on MacOS X 10.8.2 on a late 2009 iMac 2.66 GHz Core 2 Duo with 8GB of RAM. So far so good. Installing Windows was no problem. Getting it online was similarly no problem. The issue came when I plugged up the ethernet cable from the 5th Gen Hobby Laser to the iMac and tried to pull an IP address. The laser boots up and searches the network for a DHCP server to get an IP address. If it can't find one it defaults to 254.253.xx.xx or some such I can't remember off the top of my head. If I set up the networking in Parallels so it used the ethernet port on the iMac, I could connect to the laser, assign it IP addresses, and run the laser, but I couldn't connect to the internet to register the laser or browse, and if I set it to a shared connection, I could get to the internet but not the laser as the virtual machine was using the wifi connection and not touching the ethernet ... plus OS X had control of it. Sorta confusing and not sure I still have my head around it... but... THIS IS WHAT WORKS (if you are using a WiFi connection to your router):
Parallels config
First get the networking going in Windows in Parallels so you can get to the web with a browser. This is easy as it just works after install by default as long as the connection on the Mac side is fine. Plug up the ethernet cable from the laser to the Mac, making sure the laser is off. Go to the Parallels settings -> Hardware -> Network and make sure it looks like this. Your MAC address will be different obviously.
SharingConfig
Now go to the Sharing Preference panel in OS X and turn on Internet Sharing. Share your connection from Wi-Fi to computers using Ethernet. This was the magic bullet we couldn't figure out for a while. This allows the mac to share the WiFi connection and the ethernet port with the virtual machine at the same time. If you are using ethernet on your Mac to connect to your router... god help you. Actually... kidding... that should be much easier, just plug the laser into the network via a switch and you should be good to go without this last step. This worked great for me, your mileage may vary.
Now when I start up the Laser it pulls 192.168.2.2 from the local network, and RetinaEngrave sees it quickly. It registered and all was well with the world. I will assign it an IP when I get over my fear of changing something that works unnecessarily.
First Cuts
I grabbed the handiest vector file I had laying around from a logo I designed for Squirrel Wingsuits, loaded it up in Illustrator, and clicked print. RetinaEngrave got it, I scaled it, turned the power down to 10% and hit print. The stroke was 1pt in Illustrator, which it turns out makes the laser do two passes on the line as that's relatively thick. Next try was at .5pt and it was much better. Then I adjusted the head focus... even better. Then scaled it up and went to 75% power and it made the beautiful cut you see to the left. Awesome. The precision is nuts. We then tried a raster image at 4% power and again, impressive precision with micro perforations on the cardboard surface. Then some text. Works beautifully. Beer to celebrate! Very very impressed with this thing. I can't wait to start some creative projects with it very soon.
fullcardboard
nutlogoclose
Side note: I got a call back this morning from the message I left yesterday about the red diode being a line not a dot. So one day call back time. Again, not bad for a company that is shat on all over the forums for having horrible customer service. I was worried, but am now very stoked with my decision to go with FSL.
Fire Fire Fire
A quick note about something I didn't mention yet. Fire. This is a laser beam firing at combustable materials after all. I've read the horror stories and got another one from the guys at FSL when I picked up my laser, so I decided early on to buy a proper fire extinguisher. I did the research and you don't want to use your standard wet chemical fire extinguisher around anything you care about, especially electronics. It's corrosive and very hard to clean up. That leaves CO2 or Halotron. Halotron is more expensive but covers a bit more as you can see in the chart below.
extinguisherChart
So I spent the $117 and got a Kidde Halotron Fire Extinguisher, 2-1/2-Pound extinguisher off Amazon. Supposedly the clean up isn't bad and it won't kill the laser if I have to use it. It now sits under the desk ready to grab.
Laser Alignment and Support

Too many labels
Aligned the laser today. Having watched the alignment tutorial video from FSL, I ordered these Intermec 4" x 6" White Direct Thermal Printer Label from Amazon to use while aligning the laser as it looked way easier to use sticker labels than taping receipts over the mirrors every time I want to align them. They were $5 for a roll of 100 and came Amazon Prime style 2 day shipping free. But, somebody screwed up. What I got was what you see to the right... a roll of 1000 that weighs 16 lbs. Oops. Anyone need labels?
The red diode dot in front of mirror 1
The red dot over the lens
While following the procedure in the video I noticed that the red diode spot wasn't much of a spot, it was more of a horizontal line. So I called FSL on their direct support number; no one answered so I left a message. I then sent an email with the images you see to the left. I got a reply in 40 minutes. Not too bad for a company having "terrible support" according to the forums. Henry said it's normal and to use the center of the line. Done. Fired a bunch of test fires and got it pretty well aligned, though I might just do it again to practice before I run any jobs. The video is easy to follow and it's super nice to have the red dot to align with instead of having to fire it over and over to get the alignment right. You can't see the actual CO2 laser beam, but you can see the red diode laser so a beam combiner shoots them through the same optical path. So once you line up the red dot with the first mark you make before mirror 2, you know they are following the same path, making alignment of the subsequent mirrors easier. Overall mine was pretty close to spot on already, I just move the beam closer to the center of the lens.
I also tensioned the guide wheels on the X carriage as demonstrated in the video Full Spectrum Laser 5th Gen CO2 Hobby Laser Proper Wheel Adjustment. It takes TINY adjustments on the eccentric wheels to get this right.
Tomorrow the iMac arrives so hopefully... first cuts tomorrow night if I can get all the software installed and Parallels/Windows 7 playing nicely together!
Laser Exhaust Complete, First Test Fire
Completed the exhaust system for my FSL 5th gen laser today and did the first test fire! All seems well. First the exhaust, then some nit picks about the setup. As mentioned in the first post about the exhaust, I got the Harbor Freight 1HP dust collector, the router speed control, and this 4" blast gate. To complete the setup I ordered this 4" stay put flexible duct hose, and made a run to Home Depot for the following:
- 4" x 5' metal rigid vent pipe
- 4" dryer vent hood
- two 4" 90 degree adjustable vent pipe elbows
- 4" x 2ft alum. vent pipe
- four 8"x8"x16" cinder blocks
- 3 roofing shingles
- four 2.5" 5/16 bolts/nuts/washers
- 2 hinges
With all this and a bunch of spare lumber I had around, I built the exhaust box. I used 2x2 for the corner supports, 3/4" plywood for the side, 3/4" MDF for the base, and some 1/2" chip board for the top. The base is around 16" square, same for the back, front is 13" x 16", sides 16" with angle cut at top to make sloped roof. Basic layout is like so.
exhaustIMG_6255
The blower is bolted to the MDF with some 2.5" 5/16ths bolts.
exhaustIMG_6257
I then cut the holes for the intake and exhaust and screwed it all together. There is a notch in the back side of the floor to run the power cable through. Running it out the bottom keeps water from running down the cable into the box, this way it'll just drip off the bottom. Some duct was run between the exhaust and the dryer vent, and a 90 deg elbow for the intake both hose clamped on. I put some hinges on the top so I have access to change motor brushes or clean it out etc.
exhaustIMG_6258
exhaustIMG_6300
I threw some shingles on top for rain protection but we'll see how that goes. Also some aluminum tape around the inlet hole to keep water out.
exhaustIMG_6302
The window insert is 1/2" plywood with a 4 1/4" circle cut into it for the blast gate and a notch for the power cable. The cable comes in the window and plugs into the router speed control with is mounted on the inside. I painted it black and am using cheapo foam pipe insulation as weather stripping and it works great.
exhaustIMG_6252
exhaustIMG_6299
exhaustIMG_6301
The blast gate lets me shut off outside air to keep the tube from freezing in the cold. Pretty simple setup and it's pretty quiet when not running full blast, which I don't foresee doing too often as it's a LOT of air at full speed.
exhaustIMG_6303
exhaustIMG_6304
Pretty happy with the setup. Easy to remove if I need to move the laser, and pretty quiet for me. We'll see what the neighbors think.
Setup and Test Fire
Setting up the water pump and air compressor was pretty simple. They forgot to put in an air tube so I had to run to Petco and get a 1/4" OD air tube for $5. The air compressor comes with a splitter which is semi annoying as you have to block all the split ports since you just need one to go to the 1/4" OD air assist input to the printer. This is my ghetto quick rig just to test it. I'll come up with something better.
air pump
The air hose on the inside of the laser that come out of the coupler wasn't seated very well so I had to take the side panel off the laser and reseat it. Otherwise everything seemed well assembled. I threw some thermal paper on the bed and fired the pumps up and did a test fire and the laser looks well aligned. Ready to rock! Just waiting on the iMac to get here that will be used to run the laser so I can run an actual job! Can't wait.
Friggin Lasers
Got it
Picked up the laser yesterday from FSL headquarters in Las Vegas. They (Lane, and Joe) gave us a nice demo and answered the few questions I had. Super nice and helpful people. Interesting to see their assembly process and warehouse. Kicking myself now for not taking photos. Laser is unboxed and in good shape (other than some packing foam that wasn't covered with plastic properly that is now glued to the bottom of the case). Gotta finish the exhaust system today!
Laser Exhaust
A laser burns/vaporizes to cut material, which means lots of smoke and nastiness coming off the laser bed, which needs to be vented away not only for optical reasons (a laser shooting through smoke gets scattered and loses power) but for health/sanity reasons. Originally I was going to put the laser in the basement workspace but after realizing I'd need to be present during cuts for safety reasons, I decided I'd rather spend that time in my office rather than the freezing ass cold basement. So... how to vent/exhaust a laser out of my office... I found this great "Laser Exhaust Systems Basics" article very helpful.
The FSL 40W 5th gen hobby laser I've ordered has a 4 inch exhaust port on the back, which can be seen in this YouTube video. They offer an exhaust fan for $250 as an accessory. I know I could get one for half that, and even FSL suggests as much mentioning the one from Harbor Freight I'll talk about below. The exhaust will come out of the laser via metal 4" flexible ducting (dryer hose style) and pass through a 4-Inch Blast Gate in a window seal probably made of painted wood. From there I'll probably run metal vent pipe down to the exhaust fan outside of the house in a weatherproof box (doghouse? plastic tub? something like this but much nicer?). This will keep most of the noise outside of the house and the blast gate will allow me to keep the cold air off the laser tube when the system is off and control the airflow when needed to a finer degree than the speed controller. Nice negative pressure system sucking air through the laser bed and venting outside. But what fan to use...?
After reading way to much about exhaust fans on the forums... I settled on a couple of options.
240 Bilge
This thread on the FSL forums recommends an in-line bilge fan, specifically a Rule 240 Marine Bilge Blower, which is $33 (plus a $17 power adaptor... it's 12V after all). That's cheap! Noise level reports are all over the map. You could easily put a dimmer switch on it to control speed. It's rated at 240 Cubic Feet/Minute (CFM).
1HP dust collector from HF
The other more popular option on all the forums is the 1HP Mini Dust Collector at Harbor Freight, referred to as "the red one". It's $99 (easily $80 with HF coupons) and can be speed controlled with a router speed controller for $20. So supposedly much more powerful but much more expensive. I like the easy speed control that will also allow me to turn the fan on and off remotely. Con is that it uses a brushed motor so the reports are that the brushes have to be replaced fairly often with regular use and that they are hard to find. The other popular option is this "green one" from Harbor Freight, which is brushless so it'll last a lot longer with less maintenance, but it's soft start so it can't be speed controlled. It's supposedly much quieter, though "the red one" is supposedly pretty quiet when not at full power.
So I'm going for the red one with speed controller as of now. (Ordered on 2/20/2013 with blast gate and 9" level from HF)
Concerns
The whole negative pressure thing could be interesting. As the Exhaust Systems Basics article mentions, a system like this needs "make up air"... or air to replace all that air you are sucking out of your space. A 500 CFM setup will suck all the air out of a 8' x 8' x 8' room in one minute, creating a vacuum. You are also pumping out all of the heat/cool of your room/house depending on the season. So in winter I'm basically blowing all my heat out the window. I'm going to set it up and see how it goes. I might have to set up an outside air feeder system or just end up putting it in the basement workshop where that's not a concern. We shall see...
